VIBRANT GRACEFUL GLASS VELLUM FOR THE HOLIDAYS
Hi, Stampers!
It's been a while since I've posted, I know. I've been working on a scrapbook of our London and Paris trip this summer and as one who does not scrapbook (only one previous scrapbook, ever), it has been quite the project! See what I mean? How do you reduce 245 photos to a reasonably-sized scrapbook?! LOL There's a whole stack of photos still in my office!

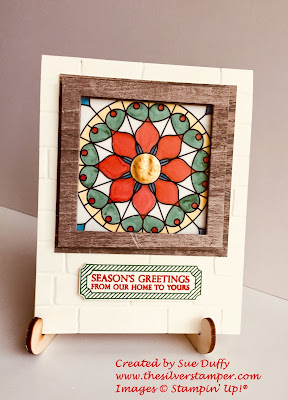
Anyway, let's get to this Graceful Glass Vellum holiday/Christmas card. The colors didn't show up as vibrant as I would have liked in this photo. The measurements are the same as the card we made at September Stamp Camp (posted Sept. 8). So let's get started!
Send me an email for a FREE project sheet.
Sue Duffy ~
mandsduffy@comcast.net
mandsduffy@comcast.net
Measurements
Very Vanilla Thick CS (you could use any color you like) - 4-1/4 x 11, score at 5-1/2, small scrap for sentiment "label"
Whisper White - 3-1/4"- 3-1/2" square
Wood Textures DSP - 3-1/2" square and a second piece 3-1/4" square
Graceful Glass Vellum - Any roughly 3X3 pattern you like
Very Vanilla Thick CS (you could use any color you like) - 4-1/4 x 11, score at 5-1/2, small scrap for sentiment "label"
Whisper White - 3-1/4"- 3-1/2" square
Wood Textures DSP - 3-1/2" square and a second piece 3-1/4" square
Graceful Glass Vellum - Any roughly 3X3 pattern you like
Instructions
- If desired, emboss front of card base (I used the Brick Wall TIEF)
- Using the second largest plain square Framelit, cut out the center of both the
3-1/2" and 3-1/4" pieces of DSP - With the fine tip end of a dark marker draw small diagonals from inside to outside corners of each "frame" piece to look like mitered corners (oops! I forgot to do that on this one - do as I say, not as I did) 😏
- Color Graceful Glass Vellum piece with Markers and/or Stampin' Blends in desired, bright colors
- NOTE - I've seen a suggestion that if you use Markers, you should color on the back side (the front is the side with the raised pattern) - I used Blends
- Glue edges of vellum piece onto WW square and adhere to card front
- Glue larger, 3-1/2" DSP frame piece over vellum piece
- Add Foam Adhesive Strips around edge of smaller frame and, if desired, darken the edges of the foam with an Early Espresso marker before adding to larger frame
- Stamp and die cut desired sentiment. Here, I used stamps and Thinlits from the Merry Christmas to All Bundle
- On this pattern of the vellum, I added Gold Shimmer Paint to the center circle and then a large Gold Faceted Gem after the photo was taken.

Brick Wall Textured Impressions Embossing Folder
[138288]
| |||

Early Espresso Stampin' Write Marker
[119680]
| |||


 Designer Vellum")


Comments
Post a Comment