DOUBLE-FRAMED STAIN GLASS "WINDOW " - September Stamp Camp

Hi, Stampers!
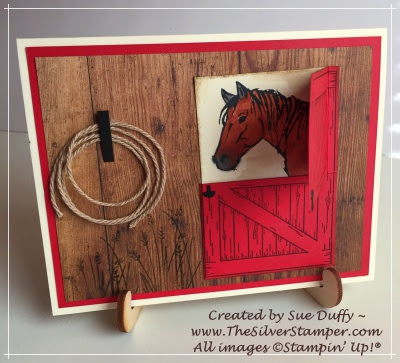
If you missed Stamp Camp today, here's one of the - not as tedious as it looks - cards we created. Last month, I saw a version of this framed stained glass idea on France Martin's blog (Frenchiestamps.com) and knew I had to attempt it. It was easier than I thought, especially since I changed up and/or eliminated several steps and enlarged France's measurements a little to make it easier. So, let's get started!
Sue Duffy ~
mandsduffy@comcast.net
Measurements
Very Vanilla Thick CS (you could use any color you like) - 4-1/4 x 11, score at 5-1/2, scrap large enough to cut oval for sentiment and small die cut for inside, approx 3 x 2
Whisper White - 3-1/4"- 3-1/2" square
Wood Textures DSP - 3-1/2" square and a second piece 3" or 3-1/4" square (3-1/4" will provide a wider top frame
Graceful Glass Vellum - I used one 3x3 from a 6x6 sheet
Instructions
- If desired, emboss front of card base (I used the Brick Wall TIEF)
- Using the second largest plain square Framelit, cut out the center of the 3-1/2" square piece of DSP and do the same with the 3"- 3-1/4" square DSP to form two frames
- With the fine tip end of a marker draw small diagonals from inside to outside corners of each "frame" piece to look like mitered corners
- Color Graceful Glass piece with Markers and/or Stampin' Blends in desired colors
- NOTE - I've seen a suggestion that if you use Markers, you should color on the back side (the front is the side with the raised pattern) - don't be afraid to experiment
- Glue edges of vellum piece onto WW square and adhere to card front
- Glue larger DSP frame piece over vellum piece
- Add Foam Adhesive Strips around edge of smaller frame and, if desired, darken the edges of the foam with an Early Espresso marker; then add to larger frame
- Stamp and die cut desired sentiment with third largest Stitched Shapes oval Framelit and adhere below frame with Dimensionals
- Add pearl or faceted accents to front and small stamped and colored die cut bird, flower or butterfly to inside of card, if desired.
Leave a Comment and/or contact me for a free, printable project sheet!
Products

Brick Wall Textured Impressions Embossing Folder
[138288]
| |||


 Designer Vellum")


Comments
Post a Comment