SHADOWY WINTER WOODS - November 2018

Inspired by LeeAnnGreff - YouTube "3Techniques with the Stamparatus"
Hi, Stampers!
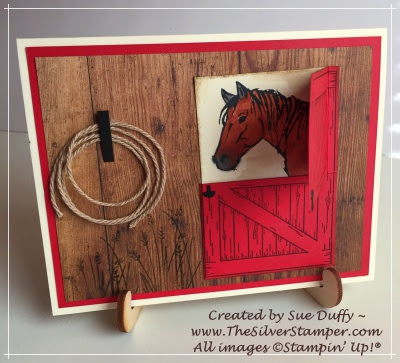
Here is another project from my November 10 Stamp Camp. LeeAnn Greff has a great video on YouTube on how to create this "shadow" effect - or, as I like to call it, three-dimensional. These subtle trees also work well for a sympathy card. Just send me an email me for a printable Project Sheet.
Happy Stampin’!
Sue Duffy ~
mandsduffy@comcast.net
Sue Duffy ~
mandsduffy@comcast.net
Products, Measurements
STAMP SETS – Winter Woods
PAPER – Whisper White Thick – 5-1/2 x 8-1/2, scored at 4-1/4; Blushing Bride – 5-1/4 x 4, Rich Razzleberry – 5 x 3 3/4; WW for oval sentiment – min. 2-3/4 x 2
INKS – Versamark, White Craft, Black Stazon, Rich Razzleberry (Blushing Bride to decorate inside)
OTHER – Stamparatus, White Embossing Powder, Heat Tool, Big Shot, Layering Ovals Framelits (or large oval punch), Basic Jewels-Rhinestones, Embossing Buddy, Stampin’ Dimensionals, Adhesives
Instructions
- Lightly dust
Rich Razzleberry piece with Embossing Buddy and place horizontally onto
Stamparatus (leaving room for slight adjustment, later) and add magnets; place
tree line stamp onto CS, slightly higher than center vertically and
centered horizontally; press Stamparatus plate down to pick up stamp, ink
with Versamark and heat emboss with White EP
- Place
embossed CS back onto Stamparatus in original spot, but then move slightly
down and to the right – about the same width as the tree trunks for "shadow" stamping – approx.
1/16th inch; anchor with magnets
- Re-ink stamp
using Stazon, but not quite all the way to the bottom of the trunks, and stamp again to
create shadow
- With White
Craft Ink, stamp small “ground” stamp randomly along bottom of trees and
dry with Heat Tool
- Stamp
sentiment in Rich Razzleberry and die cut with desired size Oval Framelit
- Adhere
layers with adhesive, add rhinestones and pop up sentiment with
Dimensionals
- Decorate
inside, if desired.

Comments
Post a Comment