CREATE ONE, GET ONE! DOUBLE DUTY DELIGHTFULLY DETAILED SPECIALTY DSP - May Stamp Camp
Hi, Stampers!
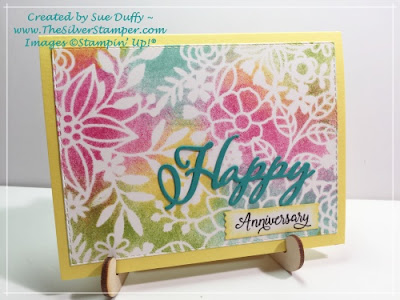
More from my May DSP-focused Stamp Camp. We turned our Delightfully Detailed Laser-Cut Specialty DSP into a stencil! The key to not tearing this delicate open-work design is to pounce the color on with your sponge, don't swirl or go back and forth, like we usually do. There are two advantages to this technique of sponging: this background looks like it was spritzed and the other, I'll show you later, so be sure to "Read more..."
Ta da! We created a lovely note card with the sponged DSP "stencil."
Product List
More from my May DSP-focused Stamp Camp. We turned our Delightfully Detailed Laser-Cut Specialty DSP into a stencil! The key to not tearing this delicate open-work design is to pounce the color on with your sponge, don't swirl or go back and forth, like we usually do. There are two advantages to this technique of sponging: this background looks like it was spritzed and the other, I'll show you later, so be sure to "Read more..."
Happy Stampin’!
Sue Duffy ~
mandsduffy@comcast.net. Sue Duffy ~
Measurements
Pineapple Punch CS – 5-1/2 x 8-1/2, scored at 4-1/4; 2 pieces Whisper White
CS - 4 x 5-1/4 OR die cut one piece
for the front with largest of Stitched Rectangles Dies; Bermuda Bay (or any
color) scrap + a scrap of Basic Black to die cut “Happy”; roughly 6x6 piece of Delightfully
Detailed Laser-Cut Specialty DSP
Instructions
- Using Washi tape or other removable tape, tape a WW layer to scrap sheet of paper or a Silicone Mat and lay 6x6 piece of Delightfully Detailed DSP (from an all-over pattern sheet) over the top of the WW piece and add a couple of pieces of tape to that, as well.
- Ink a sponge with Melon Mambo, for example, and pounce sponge onto DSP/WW layers in a few random locations; then move on to remainder of colors you choose or, if desired, use just one color. We used Melon Mambo, Pineapple Punch, Lemon Lime Twist (or Granny Apple Green), Bermuda Bay and Highland Heather.
- Remove "stencil," but don't discard. Sponge edges of WW if desired and adhere to Pineapple Punch card base.
- Die cut a Happy sentiment from Bermuda Bay CS and a second from Black CS and layer together, offsetting Black a little, and adhere to card front with bottom of word approx. 1” from bottom of base and to the right of center. Use glue dots or liquid glue - sparingly.
- Add desired additional word stamped directly or on a strip of WW or small label to complete card front, add a decorated WW piece to inside of card and that’s it!
Ta da! We created a lovely note card with the sponged DSP "stencil."
- Lay your colored DSP over a note card and snip off those parts of the design you don't want. Before adhering, sponge on more color if you want.
- Use just a few dots of liquid glue here and there and along the edge if you have a bit of framing left over (look closer above).
- Add a sentiment, or "Just a note...," a couple of Glitter Enamel Dots, decorate an envelope to match (we used a stamp from Beautiful Bouquet), and that's it!


Comments
Post a Comment