SHARE SUNSHINE $12 CHARITY DOWNLOAD SAMPLES
Have fun!
Sue Duffy ~
mandsduffy@comcast.net
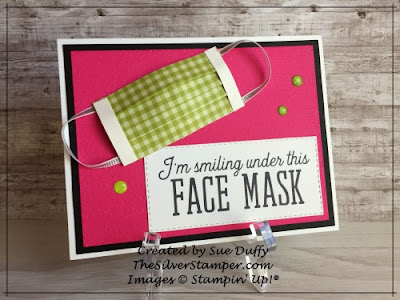
DSP - 2-3/4 x 2-1/8; score, with the 2-1/8" edge at the top, at 1/2, 5/8, 1, 1-1/8, 1-1/2 and 1-5/8. (I can't tell you how many times I scored it the wrong way!)
HINT - use your Simply Scored if you have one - when I tried to use my trimmer, it just never seemed to come out right and it was hard to hang on to this little thing. OR, cut a scrap of DSP 2-3/4 X whatever, do the scoring on your trimmer and then just trim it to 2-1/8.
As in the video, accordion fold those little pleats and burnish on both sides. On the back side, add a strip of tape along each side edge, holding your pleats in place. Add a 1/4" strip of card stock over the tape.
HINTS - Lisa added additional 1/4 x 2-3/4 strips of CS at the top and bottom of the mask, as well. I did not, and I don't think it is necessary, as our DSP is pretty sturdy. Also, I suggest cutting your 1/4" strips at least 1-1/2" long and trimming excess later - my masks never seemed to be the same size after pleating.
Add tape to the ends on the front side of the mask.
HINT - You don't need to stick to white. Notice on the mask that's on the Bermuda Bay card, I used gingham on the front strips.
Cut some 1/8" ribbon at 2-3/4" long and add to each corner with a Mini Glue Dot. Carefully spread the middle pleats our a little to round out the mask somewhat, and you're done! I simply added an additional glue dot at each corner to adhere to my card. You could also add some little punched flowers, some bling, the possibilities are endless.
Don't hesitate to let me know if you have any questions at all. Another sample or two to follow. Here is the link to order the .pdf. NO commissions, no profit, ALL proceeds go to Covid-19 charities. https://www.thesilverstamper.com/2020/04/share-sunshine-pdf-download-for-who-and.html
Products I used are below, other than DSP and ribbon and, of course, the digital stamps. Pick any DSP and ribbon - I used retired!.
Sue Duffy ~


Comments
Post a Comment